Saturday, September 6, 2014

Finally Painting the Bottom

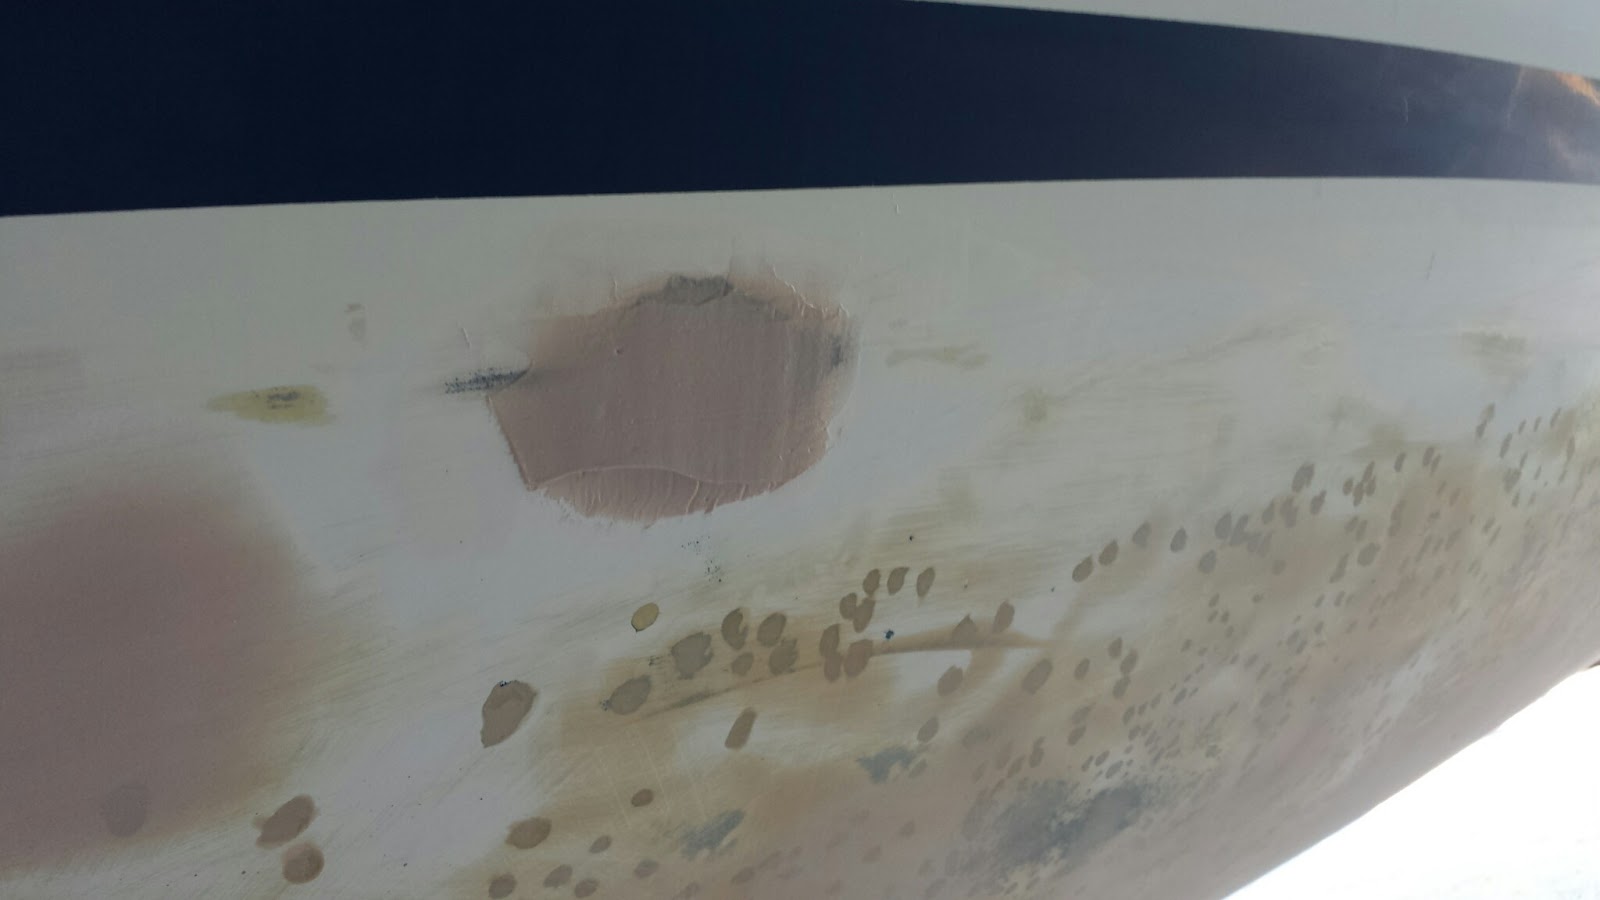
I finally, caved and said --- it is good enough!  Time to paint. I think Peter and James were ready way before I was.  Even though we plan to dry sail the boat, we opted to paint the bottom with the Interlux Interprotect 2002e White barrier paint.  This paint is actually sandable, and would allow us to get the bottom of the boat extremely smooth, and at the same time provide a barrier coat for when we do leave it in the water for a week here and there.  Here is what she looks like after a couple of coats of paint.


This is went it really started to get exciting.  All of that brown QuickFair splotchy brown on the bottom is completely covered.  We ended up rolling on 2 full gallons, in roughly four coats.  I wanted it to go on thick, so I could sand it down.  We thinned it out with 10% Interlux 2333N Reducing agent to minimize the orange peel.  It felt great to get it on the boat.  Feels like we are getting soooooo close!  The ultimate plan is to sand this smooth, and then put a final coat of PErformance Epoxy on the bottom to cover the Interprotect 2002e.  Just a quick note, as you can see from the picture, the "white" Interlux Interprotect is really slightly gray.

Tired of Fairing

Believe it  or not, it took a lot of fairing to get the hull straight and smooth.  I kept thinking that every time I put more QuickFair on, it would be the last time.  I would let it harden, and the head up to the lake to sand it smooth, just to discover a few more places that needed to be filled.  I also had one mix of QuickFair not get mixed quite right, and  as a result it never set up properly (never hardened).  This was a real bummer, as it meant I had to first sand off all of  this "bad" epoxy, and then mix up a new batch and apply it.

In the end, the boat looked pretty lousy, with the splotchy tan bottom, but it really felt pretty good and  smooth.  It just looked bad.  So I couldn't wait to get some paint on it.  In the lower picture, you can see all the blisters that were hand ground out (with a dremel tool), and then refilled (with QuickFair), and then sanded smooth.  This is sanded with about 80 grit sandpaper.  It was very important to use longboard sanding techniques to ensure that the hull remained straight and  not rippled.  So most of the sanding was done by hand with a long board.  It was getting close though!  Almost ready for painting!


Filling the Thru-Hull

This boat still had the sink drain that exited just above the waterline on the starboard side. While I was originally not going to fool with it, James convinced me that it would not be an overly involved project to fill it.  Since we were in the process of fairing out the hull anyway, I said why not.  Here is what it looked like before hand.

The sink holding tank (fresh water for the sink) had already been removed.  This is important, as it blocks access to this part of the hull under the sink. James took an angle grinder, and cut off the thru-hull stub that the drain pipe was connected to, and ground down the inside of the hull.  It is important to grind both sides here to ensure that the plug made of epoxy filler won't pop either in or out.  After grinding, we taped the outside the hull in preparation for filling from the inside.  Since this part of the hull is close to vertical, we taped half a dixie cup the the top open in the up direction, to contain the epoxy resin mix and hold it in place.  In this case we used West system fiber filler with SystemThree epoxy to mix up a pretty gooey  consistency.  It was not quite peanut butter consistency, but much thicker than syrup.  You want it to run into all the voids, but not run too much so it all runs out.

After that set up, James ground out the excess (the half shape of the dixie cup) on the inside, and we pealed back the tape on the outside.  The epoxy had shrunk in slightly on the outside, which was just perfect for adding some QuickFair fairing compound and getting it perfectly smooth. Here is what it looks like after.  Once this is painted, you'll never know if was there.  Took a couple of hours to do, but in retrospect, it was well worth it.  Thanks James!


Fairing the Keel

Once the boat was back on the trailer, it was time to start fairing the hull to get it as smooth as possible.  It started with James helping us fair the keel, which was really in pretty bad shape.  We used an angle grinder with a wire brush to take off all the epoxy and paint that was loose.  Then we ground down all edges.  After that, James used the QuickFair to build it back up and shaped the keel to optimal/class legal shape using the proper keel templates.  Needless to say, it really turned out well - and I am sure it will be extremely fast.  He also made sure that the keel was optimally located (I think as far aft as possible).  You can get a sense for how bad it  was from the pictures below, and how much better it looks now.

The photo above is from before ....

Below is the photo of the keep after ....   Much improved!  He also worked on the rudder and got it faired as well.


Thursday, August 14, 2014

Back on the Trailer!

Well, we finally got to a point that we felt we could get that boat back on the trailer.  The keel had not yet been done, and would need a significant amount work.  Looking at the calendar, and knowing that it would take us way too long, we decided to go with a pro.  James has done this several times, and has access to templates to get it just right.  But in order for him to work on the keel, we had to get the boat on the trailer. So once again, out come the concrete blocks and the 10 ton jack!
 So, this was the goal: get the boat up high enough, by raising the beams one block at at time, that that we can get the trailer underneath.  Also, we need to be sure that we space the blocks (towers) far enough apart so we can back the trailer underneath.  Took a bit of thinking and planning, because the boat would roll up, but once we started the stacks, it would be hard to move them.  Oh, and did I mention that the boat needed to sit right in the middle of the beams, so it would sit on the trailer properly?  Lots of details to watch.

 So far it was looking pretty good.  Notice how the aft port block stack is slightly lower and leaning outward somewhat?  This was something we really had to watch, because when raising the opposite side, the blocks preferred to lean and stay flat with the beam, rather than staying flat with the earth and having the beam pivot on the edge of the blocks.  It was easy to fix, simply relieve the pressure on that stack by jacking up the beam on that side and letting the block stack level out before dropping the beam back down.  Was just a bit of a pain, because it meant a few extra steps.

Finally, we got the boat up in the air.  Felt a whole lot higher when we did it, and was a bit un-nerving to have it just swinging there.  In the end, I think we got lucky, because the boat ended up pretty much in the middle  of the beams, and the stacks were far enough apart to let the trailer underneath, and we had enough blocks to get it up just high enough.

After that it was time to put the pads on the trailer (we had left them off to help with clearing the beams), rais the pads up to hold the hull, and then remove the beams.  Once the beams were down, the block stacks came down, and ta-da .... the boat was off the ground, and back on the trailer.  All-in-all, since this was the 3rd iteration, I would guess that it took us just about 2.5 hours to do this.  Not too bad!

Wednesday, August 13, 2014

Seems like we already did this!!?

Time to do the starboard side.  Fortunately, by this time Peter has become an expert at prepping the QuickFare,  filling the holes, and then skimming it all with a wide putty knife to remove the excess filler.  It works very well, and significantly reduces the amount of sanding that must be done.  Of course we have to do it several times to get all of the holes filled, as the epoxy filler shrinks a bit as it hardens.
In this picture we hadn't yet started doing grinding, sanding or filling this starboard side.  You can see from the photo that we had to remove a layer of Interlux 2000 that the previous owner had put on the boat at some point.  As you can see it was a lot of work.  Did I mention that great long boards that Peter made? We also continued using that extremely heavy grit sand paper (36 grit) to quickly knock down the high spots. Just more of the same...

Monday, July 28, 2014

Flippin' the Boat

In any other small boat sailing context, this would not be any issue.  However, in this case ... well ... it was a bit more complicated.  We reversed the process we used to get the boat onto the ground, and block-by-block raised the boat back up into the air, and then got it to roll the other direction when we started letting it back down.  You have to be sure to have extra slip space on each side of you, as you literally are flipping it over with the keel as the pivot point.  Here are a few pictures of the adventure.


In this last picture, you can see the QuickFair on the Port side, and the unsanded, only slightly ground out Starboard side.  Time to start grinding and sanding all over again.


Filling Craters on the Moon

This is precisely how it felt.  It seemed as if we had drilled a million little holes in the hull, and now  everyone of them had to be filled.  While I have used the West System epoxy and filler before, I have always found it cahllenging to get the mixture and consistency just right without using measuring cups/pumps.  So when I started looking around, I found the System Three Epoxy products, and in particular the QuickFair product.  It go good reviews on the JamesTown Distributors website, so I decided to give it a try.  It is a simple epoxy and hardener that already has the glass beads mixed in with the resin.  It uses a 2:1 ratio when mixing, that I have become quite good at eyeballing when mixing.  The other big criteria for our epoxy filling solution was it needed to be relatively easy to sand.  By all accounts this stuff worked great. Made prep work quick and for the most part worked like a charm.

Initially, we were putting way too much on, and then having to sand it off and continue fairing it.  Finally Peter devised a "skimming" method that used the old contour of the hull to fill just the holes using a large putty knife and paint mixing sticks.  It meant that when the epoxy shrunk down some, you had to come back over and do it again, but it certainly reduced the amount of sanding.

So speaking of sanding, Peter made some great sanding boards of different lengths out of lauan plywood with little wooden handles screwed and glued on a angles that made holding them.  We used some adhesive and attached sand paper to them.  The smallest one was about 30 inches, and the longest was about 50 inches.  These "long boards" allowed us to get really good fairing without creating more divits and ruts, that an orbital sander might create.  The only drawback was that we had to hand sand the entire hull, multiple times (after each reapplication of the QuickFair).  After starting with 80 grit sand paper, we worked out way down to 60 grit,m 50 grit, and finally down to 36 grit.  This 36 grit was awesome.  Tough as nails, and just tore through the epoxy and filler.  I''l try to take some pics of the materials and get those posted.

Needless to say, this took --- FOREVER!!!  It just really did feel like we were never going to finish.  Always a little more to do.  And oh, by the way, when were were done ... we had to flip the boat and do the other side!!!!  Ugh.

In retrospect, I think we should have grabbed the orbitals and just gone at it, and worried about all the detail fairing for later.  But the end result was a hull that was pretty well faired when it was all said and done.

Sunday, July 27, 2014

Tearing up the Deck

 When we got the boat, we knew that the deck was soft around the port chain plate.  As a matter of fact, the very first step I took on the boat was onto this soft area, and I almost stepped right back off with the thoughts of just walking away.  Fortunately, the rest of the deck did not appear to have any soft spots, so I figured this one was primarily a result of the poor sealing of special "waste port" just outboard of the port chain plate.  Frankly, we have not idea why one would ever need a wast port on a J/24, but as you can see, it is there.

   
I've been eager to find out just how bad this rot is, and this weekend, we decided to "dig in" and find out.  The idea was to preserve the deck pattern above by cutting out the bottom layer of fiberglass from inside the cabin.  This would allow us to dig out the rot from underneath without compromising the look of the deck from above, or at least that was the thinking.


As you can see the rot was quite extensive!  I could just grab hand fulls of mushy rotten balsa, and just squeeze the water out of it.  It was really bad.  I used an oscillating cutting tool to cut through the fiberglass and then to shave out the balsa core.  I let this sit for over a year (while the rest of the bottom work was being done) in order to get good and dry.  

Grinding Out the Blisters

Remember, the whole challenge with this boat is that it was full of blisters.  It had been left in the water for many many years.  As a result, it had what someone described as having a "constellation" of blisters all over the bottom.  Maybe a better description would have been, it looked like the surface of the moon.  Here are a few "before" pictures.

So I seriously considered taking a planer, and shaving off all of the gelcoat on this boat.  If it weren't a one design I think I would have done that.  The gelcoat was so blistered that it was difficult to see any areas that weren't blistered. We started by sanding off the old ant-fouling paint and then an old layer of what appeared to be Interlux 2000 (gray).  At that point the blisters were in plain sight.  Some had already been opened up by the sanding, but many were not. We discovered that a strong pressure washer did a great job of taking off some of the gelcoat and opening up the blisters as well.
But what in the end proved to be the most effective was to use a dremmel tool, with a 60-grit sanding wheel, and manually grinding out each blister.  It was painstaking work, and took forever.  There were a few sections where the gelcoat had become so delaminated, that it flaked off leaving entire regions bare to the fiberglass.  It was about this time that our wives started referring to the boat as FreeDumb!!  I was beginning to wonder about this myself.  In the end, the entire below water section of the hull looked just like this.
If you do this yourself, please be sure to wear eye protection and a good respirator, as the fluid in the blisters is nasty and the dust certainly would not be good for the lungs.

Getting if Off the Trailer

So the first challenge was to get it off the trailer.  All of the deck hardware had already been removed (remember we were planning to flip it).  This is what it looked like on the trailer.

My friend Doug suggested a method he had used on his J/22 before.  It involved building building some beams and using concrete blocks to build 4 pillars (by stacking the blocks) on the outside of the trailer.  Using a large 10 ton jack, we could then gently lift the boat off the trailer, and add a block under each beam.  Once the boat was high enough we just pulled the trailer out from under the boat, and began the process of letting it back down.  Here are some pics to illustrate.

 The boat now is off the trailer, and dangling in mid air.

Time to get the boat down on the ground. Notice that Stbd front stack leaning slightly in the picture above!!  We had to take extra precaution to try and get the initial ground pretty level so that the stack wouldn't be leaning too much in any direction.

We had to go block by block all the way around the boat on each stack, until the boat was more or less laying on it's side.  Seem like a lot of work, but in reality, it only took a couple of hours.  If you are tempted to do this yourself, my recommendation is that you get the big concrete blocks, and that you just pay attention to the stacks, as they will try to lean.  Would I do it this was again?  Probably.  It really did make the work a ton easier.


Wow - This really is late

Time has flown by, and the boat project took a back seat to other events for quite a while.  But I want to provide an update on the progress, as we have really worked hard to get it going this summer.

So the short story is we abandoned the idea of flipping the boat completely upside down.  We realized that it was going to be extremely difficult to get the keel up once we had the boat on its side without the use of a crane or hoist.  So plan B!

Plan B was to lay the boat on its side.  Why?  Because it was going to save our shoulders and our backs ... the idea was to do one side, then flip it over and do the other.  This would mean we would need a way to get it up and down and off the trailer.  So with Plan B in place, we started the process.

Monday, February 27, 2012

Clearing the Deck

I think we mentioned in a earlier post that we were considering flipping the boat upside down to work on the bottom.  Others have done this http://2842j24.blogspot.com/2009/08/bottom-fairing.html, and it looks like it could make working on the bottom of the boat a lot easier, both to do, and on our shoulders.  We've talked with Doug M who has some experience in getting his J/22 from the horizontal position back upright, so we are planning to give this a shot (more about  how in a later post).  But before we can flip the ol' boat, we need to clear the deck.  So this past weekend, we took off all the hardware that (1) either we weren't going to use anyway, or (2) would get in the way when we go to flip her.  This included all the stanchion bases, bow and stern pulpits, and a variety of other hardware.  Below is a picture of 2762 ready to roll!


The remaining question is once it is flipped, where should the support beams be placed?  There is a nice flat spot fight at the stern (aft of the lazarettes) that we think would work for support at the back.  Our main concern is up near the front.  The deck curves, and we are not sure how best to support the full weight of the keel.  Another option is to take off the entire main hatch (slide and cover) and build a post to help support the weight of the keel directly.  But we still need to choose where to locate a cross beam on the bow.  In addition, I think we will build some small supports to hold up the gunnels of the boat right where the bulkhead attaches, as that will both help to support the weight of the keel, and provide some side-to-side stability.  Feel free to add suggestions!

Monday, February 20, 2012

The Trailer Pads are Done (almost)

Several posts back we talked about making the new brackets and pads for the trailer we are refurbishing for this boat.  The plywood pads were painted and prepped, and then we used 1/4" stainless carriage (or step) bolts and stainless nylock nuts to bolt the brackets to the pads.  Here is what they looked like with the hardware on.


After that, we discussed a couple of options for padding.  One was the double D rubber dock fender molding http://www.taylormadeproducts.com/dockprod.html, and while nice, the price on this material just wasn't going to work.  Next option was to use some of the trailer bunk board material, which once again seemed like it would work just fine, but was a bit pricey for what you get.  After thinking about it some, we decided to use some indoor/outdoor BeauLieu Perfection Gray carpet from Home Depot (SKU #591529).  At ~$0.60/sq ft, the price was just right. While it isn't the softest material, it should work fine for the boat, at least for now.  Ended up using a hot glue gun to glue it down, just along the edges.  We didn't want any water to get trapped behind the carpet being held there by glue beads.


Used some clamps to make sure we were getting good tight adhesion to the edges of the pads.  Here are a couple of the final pads with the carpet glued on.  So the Trailer Pad and Bracket project is almost complete.  Just have to go out and mount them to the trailer posts.

Few More Blister Pictures

Here are just a few more blister pictures, a little closer up.  If you look closely, you'll notice that we did not even get all of them.  So, I think after much thought, a little angst, and some trepidation, we have decided that we need to strip all of the gelcoat off, and then recoat the bottom.
 

So the question of the day has become, what tools do we use to strip the bottom.  I've read on several of the forums, that you can use a large disk sander, but that seems like an awful lot of work with some real potential for lots of "Whoops!"  There is a tool called a marine shaver http://www.paintshaver.com/marineshaver.html that looks up to the task, but at $600-$800 seems a bit too much for this project.  So, we are seriously considering using a 3 1/4" planer.  The Makita KP0800K http://www.makita.com/en-us/Modules/Tools/ToolDetails.aspx?ID=316422 , the Dewalt DW680K http://www.dewalt.com/tools/woodworking-hand-planers-dw680k.aspx is another option.  Both of these are being considered, because they are reasonably priced, and if we mess up the tool in the process we are not out a lot of money.  So that is the plan at the moment.

Ultimately, we'll peel off the gelcoat and outer glass layer, then we'll wet out with epoxy, apply filler, fair, filler, fair (until it is smooth), and then we'll come back over it with 6-8 coats of Interlux Interprotect 2000 or some barrier coat.

Tuesday, January 31, 2012

Starting to Work on the Bottom

After getting the boat out of the water, we started sanding the bottom of the boat.  The boat had some sort of ablative anti-fouling paint on it, and then what looks to be Interlux 2000 under that.  We knew the boat had blisters, but I didn't fully appreciate how many.  Once we started getting into the job, more and more of these little blisters started appearing. here are a couple of before and after pictures.


After slaving away with some 40 grit sandpaper on both orbital and belt sanders, Peter suggested that we try his pressure washer.  I was quite skeptical that it would do anything to the epoxy paint, but thought it might help with getting the rest of the ablative anti-fouling paint off.  So we lugged it up there, and gave it a shot.


I was very surprised to see the pressure washer strip off not only the interlux 2000 epoxy paint, but also start to blow off the gel-coat where the blisters were.  It didn't seem to affect the gel-coat in areas that were blister free, but in those areas were we had blisters, it just got up under the gel-coat and took it right off.  I was really amazed.  Peter tells me the secret is in the nozzle, and he is using a version of this roto-blaster type nozzle, and it is incredible.  Needless to say, it is a TON easier than trying to sand all of this stuff off.  The only dilemma a this point is, should we take off all of the gel-coat, and the start from there.  Not sure I want to try messing with spraying new gel-coat, but I have gotten suggestions to replace it with rolled on epoxy.

Update on Pads and Brackets

After some discussion we decided to prime the metal brackets with Rustoleum 7769 Rusty Metal Primer and the top coat them with the Rustoleum 7786 Smoke Gray Enamel.  Figured this would give us about the best protection without having to go the epoxy paint route.  Right now we are planning to go this route with the entire trailer too.

Here some of our helpers are prepping the pad for priming and painting.  For the most part the boys are anxious to be a part of the process, as long as the process doesn't take too long :).


This is how the final brackets turned out.  They are sitting on the unfinished pads.  The original pads has these holes in them, and while I am not sure I know exactly why, I am guessing they help to dry out the space between the carpet and the pad.  I assume this helps to prevent the carpet from holding moisture resulting in blisters.

Next step is to paint the pads.  Wood will be primed with Zinsser Perma-White and the top coated with some left over Sherwin Williams exterior latex paint I have.

Thursday, January 12, 2012

Building Trailer Pad Brackets

Once the trailer arrived, we realized that the pads and pad brackets just simply were too far gone.  So I started looking around for some raw materials to make replacements.


 Here is a shot of one of the original brackets that had been cut off the screw post.  This was a good one; the angle iron on some of the others had completely rusted away.  So I went over to Home Depot to look for some materials, but they just did not have the 3"x2" angle iron or the schedule 40 pipe.
A quick visit to the www.mcmastercarr.com website, and I found

Line
DescriptionOrderedShippedBalanceUnit PriceTotal
19017K24Low-Carbon Steel 90 Degree Angle, 3/16" Thick, 3" Leg Length, 6' Length1
Each
1032.32
Each
32.32
27750K116Standard-Wall Steel Unthreaded Pipe, 2 Pipe Size, 1' Length1
Each
1012.05
Each
12.05
We were able to use the metal band saw in the little shop at my work to cut out al the parts.  Cut the angle iron into 11" lengths, and then cut one side down to 2" and angled the corners to match the original.  The pipe was cut into 1.5" lengths and predrilled for the retaining bolt.  A friend of mine offered to weld the pipe onto the angle iron, and before we knew it -- new brackets.  Below is a picture of what they looked like after the fact.  We'll end up painting these when we paint the trailer.


Tom had also found some scrap 3/4" ply wood and already cut out some pad shapes.  A little bit of sanding on the corners, and we are set to go.  Will probably paint the pads with some left over exterior house paint I have.  Tom also has some indoor/outdoor carpet that I think we will use for padding.

Locate a Trailer

While I would have preferred to get a double axle galvanized trailer, the budget for this effort would simply not allow for it.  So, I posted to a few websites and recieved a couple of replies for trailers.  In the end we bought an older Triad Trailer that had a considerable amount of rust on it, but that seemed adequate for the local hauling we would be doing with it.  

My good friend Tom Kirby offered to go pick it up, and by the time it got back to Atlanta, almost all of the pads had disintegrated, one of the upright support posts had completely broken off, and one of the keel guide boards had come off.  So we have some work ahead of us.